H2O’s AutoML can be used for automating the machine learning workflow, which includes automatic training and tuning of many models within a user-specified time limit. Stacked Ensembles will be automatically trained on collections of individual models to produce highly predictive ensemble models which, in most cases, will be the top performing models in the AutoML Leaderboard. – AutoML: Automatic Machine Learning
After this years ML conference in Munich I wanted to try AutoML from H2O.ai. During the Christmas holidays I found some time and I took the 🚢 Titanic dataset and tried different things. AutoML trains different models like XGBoost, TensorFlow, LightGBM or GLM. In the end I have a model that I can use in a Java application that recognizes if a person survived the Titanic disaster or not.
I’ve divided this blog post into two parts. The first gives an overview of H2O and H2O Flow. The second shows how to use H2O in Python.
You can find the source code of the examples on Github on choas/h2o-titanic.
Driverless AI
Driverless AI is a good starting point to get a sense of H2O. Driverless AI has a UI for loading data and running AutoML, which automatically creates many ML models. A tutorial explains how it works, so you don’t need to know anything about H2O, AutoML and the trained models. But to use them, you should understand what they do.
Driverless AI is quite helpful to get an understanding and overview of H2O:
- import data
- create a frame out of these data
- split the frame into a training and validating frames
- run AutoML
- download the model (POJO and MOJO)
H2O Flow can also perform these steps.
H2O Flow
You can run H2O AutoML with H2O Flow or with Python, R, Java and Scala. In this blog post I’ll look into H2O Flow.
H2O Flow is like a Jupyter Notebook where you can mix up code and text. But H2O Flow offers only a certain amount of commands and they are all H2O Flow based. But the H2O Flow commands are widget-based. When you execute a command without parameters, H2O Flow creates a widget that allows you to configure certain parameters and run the command. This can result in another widget that you can configure or run.
Getting started
H2O Flow is Java-based. The documentation Using Flow - H2O’s Web UI is a very good starting point. All you need to do is download a jar file, run it and open a browser. On the right side you will find a Help tab. The Quick Start Video gives an overview and explains the installation of H2O Flow. There is also a link to some example flows.
H2O Flow example
As I have written before, I have created an example with Titanic data. If you want to run it yourself then you can find my H2O Flow file here: choas/h2o-titianic/flow/Titanic.flow
You load this file in H2O Flow and you can execute it either step by step or all at once. For the AutoML execution I just run the XGBoost algorithm. Also for a maximum of 30 seconds, so that the total runtime is around 3 minutes - depending on your computer.
Within the example file the steps are documented, but I also list them here:
-
First, I read the Titanic data. H2O Flow can do this with local data as well as with data from the internet. I use the data I’ve uploaded on the Github project.
-
After the data are read, I display them. You can see that 177 values are missing at the age column. H2O Flow offers a simple way to adjust the data. In this case I set the age with the median method with interpolate as combine method. Afterwards I display the data and you can see that there are no missing values at the age column.
-
After adjusting the data I divide them into 75% training data and 25% validation data with the splitFrame method.
-
In the next step I run AutoML. I’ve already configured the parameters with a widget. For the data I use the training and validation data and the model is trained on the Survived column.
-
I only use the XGBoost algorithm, therefore the example runs faster. Also the maximum execution time is defined for 30 seconds and the AutoML runs within 3 minutes. Of course this depends on the used computer.
-
Since not all columns have been adjusted and not all values are relevant, I skip PassengerId, Name, Ticket and Cabin during the training.
After running AutoML, the models are displayed in the Leaderboard. The best model is at the top of the list. I can’t show the best model automatically in the example, because the names of the models change with every run. You have to select it yourself.
The model shows different graphics like Logloss, Training and Validation Metrics and also the model parameters, which were used to train the model.
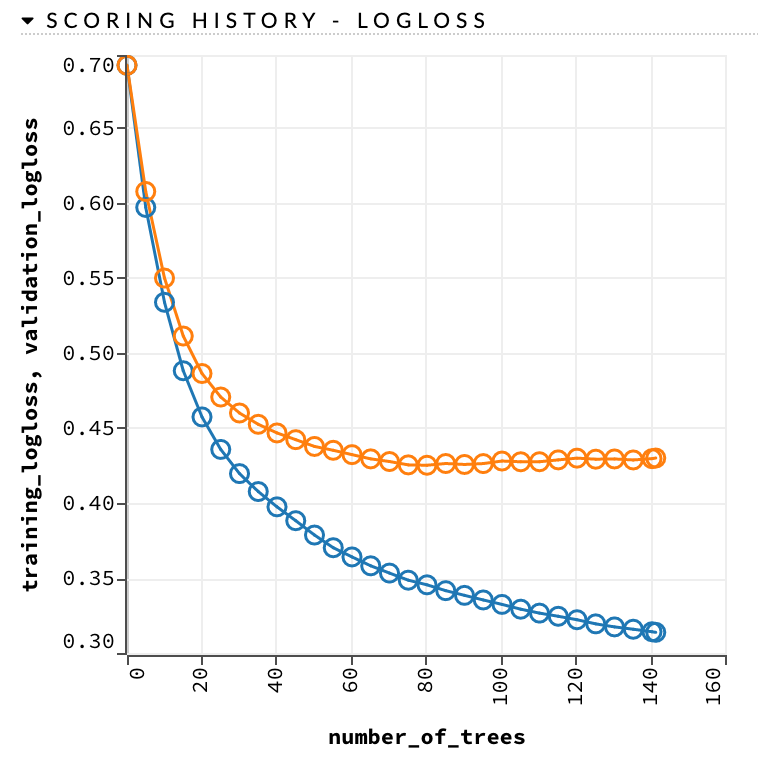
The graphics shows the LogLoss.
Run AutoML yourself
To create an AutoML model yourself you have to enter runAutoML as a command and execute it. A widget opens and you can specify the parameters. These are the training data and validation data, the models to be used and the maximum runtime a model may need. Depending on the data you can exclude particular columns. With Build Models H2O Flow creates the command with the parameters, which you then execute. After a certain time you will get the models.
Java example
When you view a trained model in H2O Flow, you also have the option to download the POJO, Model Deployment Package (MOJO) and Gen Model. These can be integrated into a Java application.
I did this for a trained model and uploaded the corresponding project to Github: choas/h2o-titanic/predict-java
EasyPredictModelWrapper model_orig = new EasyPredictModelWrapper(
  MojoModel.load(
    "src/main/resources/XGBoost_grid__1_AutoML_20200212_210321_model_3.zip"
  ));
I have created a Gradle project for this. The app.java provides the data for the prediction and executes it. The App class reads the MOJO file when creating the EasyPredictModelWrapper instance. The MOJO file can be found as a zip file in the main/resources directory. In the libs directory you will also find the H2O library as a jar file.
RowData rowTest896 = new RowData();
rowTest896.put("Pclass", "3");
rowTest896.put("Sex", "female");
rowTest896.put("Age", "22.0");
rowTest896.put("SibSp", "1");
rowTest896.put("Parch", "1");
rowTest896.put("Fare", "12.2875");
rowTest896.put("Embarked", "S");
Afterwards the values are defined, which are then passed to the Prediction. The printProbabilities method executes the prediction and if the result is greater than 0.5, true is printed for survived prediction.
ID 896
0.3737413287162781, 0.6262586712837219
survived? true
Summary
Driverless AI provides an overview of H2O AutoML. H2O Flow uses AutoML to create numerous models. It is also possible to adjust data. H2O Flow gives an idea how a model can be created. The model can be exported as Java library.
some more links
Next
What’s next? H2O is also available for Python, R, Scala and Java. In the next blog post I will use H2O with Python.